Learning Areas: The Arts- creating and making, exploring and responding, Interpersonal development- working in teams, Communication- listening, viewing and responding, English -language and literature
Materials: as many white wax crayons as children, heavy A3 paper, paint trays, watercolour paints, brushes, buckets of water, smocks
Tuning In - Let's Read a Book!
Materials: as many white wax crayons as children, heavy A3 paper, paint trays, watercolour paints, brushes, buckets of water, smocks
Tuning In - Let's Read a Book!
Are any of you familiar with this author?
(holds up book I Want A Pet by Lauren Child)
Lauren Child writes and illustrates her own books. She isn’t too worried about being really neat with her lines – in fact she is quite messy, but I think they give a great feeling for what is happening in the story and how all the different characters are feeling.
(holds up book I Want A Pet by Lauren Child)
 |
| I Want A Pet Frances Lincoln Children's Books, 2013 |
Lauren Child writes and illustrates her own books. She isn’t too worried about being really neat with her lines – in fact she is quite messy, but I think they give a great feeling for what is happening in the story and how all the different characters are feeling.
Exploring: What is a portrait?
Who knows what a portrait is?
"A picture of something?"
"Is it a pet?"
"Like a picture of somebody?"
"A picture of something?"
"Is it a pet?"
"Like a picture of somebody?"
That's right. It is usually a picture of a person, although it is also possible to make portraits of animals. Portraits usually show mainly the face of the person or animal, but might include the shoulders, the torso or the whole body.
Portraits usually try to give you a sense of the character of the person and perhaps something about the way they are feeling.
There are lots of ways to make a portrait. We are
going to use a combination of techniques today.
The first technique is called continuous line
Continuous line is a game that
artists like to play. The rules of the game are that once you put your pencil
or in our case, crayon onto the paper, you don’t take it off until the drawing
is finished. We had a play with continuous line when we drew with chalk out on the basketball court (#4 Big Lines, No End In Sight)
The second rule is that you try to look only at the
person you are drawing – not at the paper.
Artists who make portraits
 |
| Self Portrait, Tracey Manuel, Date? |
Look at this second portrait of a woman (below).We don't need to feel limited by the colours that we see. An artist can paint, draw, paste or sculpt in the colours that convey what they want to say about what they see.
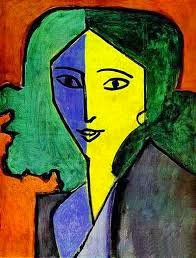 |
| Portrait of Lydia , Henri Matisse, 1947 |
Making - Part A
We will use a crayon to draw portraits of one another.
Here’s the tricky part – we are going to use white crayons. So even if you do
look at your paper you won’t see much. There is a magic trick we’re going to do
with our continuous line portraits but I’m going to keep that as a surprise.
The important things to remember are :
1) Keep your crayon on the page.
2) Look at the person you are drawing and
3) to make our magic work you need to press quite hard with your crayon.
1) Keep your crayon on the page.
2) Look at the person you are drawing and
3) to make our magic work you need to press quite hard with your crayon.
 |
| Drawing me drawing you drawing me... Image Copyright H.Marsh, 2013 *please do not repost images of children. This is against Australia law unless you have parental permission |
Preps and ones find it almost impossible to look at their subject and not at the page. I'm not sure that they even have any choice in this - it is as though when their hand is moving they must watch their hand. I find it so interesting to learn about the developmental stages and how they apply to art. Still, they are trying to represent the person in front of them and the style of each child is unique.
Making - Part B
Now it’s time to make our magic.
I would like you to lay out your line portraits face
down on the table. Your teacher and I are going to come around and write your name as
artist and the name of the person you drew.
Great. Let me show you a line drawing I made earlier
today.
 |
| Portrait of Juno , Image Copyright Heather Marsh, 2013 |
This portrait was made using a technique called wax resist.
The waxy crayon acts just like an umbrella for the paper - letting the watery paint bead off - it won't stick to the page- leaving it white where you have drawn.
The waxy crayon acts just like an umbrella for the paper - letting the watery paint bead off - it won't stick to the page- leaving it white where you have drawn.
We are going to re-use some techniques you guys are already familiar with. Do you
remember when we make our colour targets with water colour? (#3 Blending colour, transforming spaces)
Can anyone tell me the techniques that helped us when we
were working with that medium?
"Wash your brush?" - yes, wash your brush between colours.
"Wash your brush?" - yes, wash your brush between colours.
"Don't drip water" - yes, wipe a little water off your brush, but remember we need the paint to be wet for this to work
"Be..don't bump or walk on other stuff" - yes, be respectful of each other as we share the paint trays. Don't walk on other people's art. Be aware of how you are moving in the space.
"Be..don't bump or walk on other stuff" - yes, be respectful of each other as we share the paint trays. Don't walk on other people's art. Be aware of how you are moving in the space.
 |
| It looks like chaos but it works! Image Copyright Heather Marsh, 2013 |


Reflection
Lets talk about our work:
What did you notice about making your portraits. What
was hard? What was easy? What worked? What didn’t work?
"I wanted to look"
" I had to cheat and look"
" I didn't like that I couldn't see my drawing but I liked doing the magic later with the paint"
"I wanted to look"
" I had to cheat and look"
" I didn't like that I couldn't see my drawing but I liked doing the magic later with the paint"
New vocabulary portrait, self-portrait, continuous line, wax resist


