Wednesday, November 20, 2013

#9 Out Of The Box

Learning Areas: The Arts- creating and making, exploring and responding, Thinking- inquiry, creativity, Science- patterns, order and organisation, Communication- listening, viewing and responding
Materials:  refrigerator box (or similar), boxed assemblage art (if you have access to it. I am lucky to have some good pieces by an artist friend at my home) 

Welcome back!  This term we are continuing our big project called Because of me. One of the most exciting things about this project is that we are creating it together – we don’t really know what the final result is going to be like.
What do we know?
It is about you, the things you are interested in and the things that are important to you; the person you are now and all the possible things you could be in the future.
What else do we know?
We know that we are going to be connecting a few different artistic elements – can anyone remember some of the elements? Colour, texture, line…
Also we might use different forms and techniques like sculpture, painting, drawing, collage, installation and assemblage. Have any of you heard of assemblage?

Putting things in boxes

Assemblage is really just a fancy way of saying  "putting things together". It comes from the word assemble. 
*At this point one of the children calls out "it's like school assembly!" 
Maybe you and your family have bought something from a shop and had to build it yourself at home- that is assembling.
Artists assemble in lots of different ways. Some artists draw, paint or cut out pictures for their assemblages. Some artists gather objects.

I’d like to show you three special assemblages by an artist called Tim Klein.
Image Copyright Heather Marsh, 2013 Artwork by Tim Klein 


The artworks are sitting side-by-side on a table at just below face height for the children. They form a line and on by one they approach the art and spend some time looking at it. I have asked them to be super-observant. 
"Notice as many things as you can" I tell them. 
"You get bonus points for noticing relationships between the objects - by that I mean if you can find a connection of some kind between one object and another"
We talk about the things we saw and speculated about why the artist might have chosen those objects. One of the boys, Johnny, told me he noticed a nest, two cocoons and a cow with wings. He thought there might be a connection between them. We talked about change and metamorphosis. It was a great conversation. 
More Assemblage
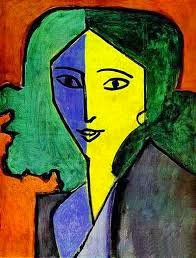
Over here are some other pictures of assemblage work artists have done. I like this work by Rosalie Gascoigne. She only started exhibiting her art when she was already 57 years old. Can you see what she has used to make this work? 
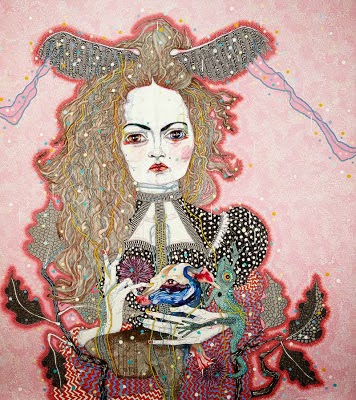
Metropolis, 1999  Image copyright of the Art Gallery of New South Wales
One of the most famous assemblage artists was Joseph Cornell. A lot of people liked his assemblages in boxes so much they copied them.
Untitled (The Hotel Eden), 1945 National Gallery of Canada

A Story – My Cat Likes to Hide In Boxes

Here is a story by Eve Sutton and Illustrated by Lynley Dodd. You might already know the work of Lynley Dodd who wrote and illustrated the Hairy McLary books.
Book cover copyright Puffin Books, 1978 


Putting things in boxes

We are going to have a go next time we work together at making a small assemblage in a box.Today, though we are going to play with the idea of boxes and what can be done with them. We are going to keep working on our artistic concept.
A fridge box is a world of potential.. Image copyright Heather Marsh, 2013

Playing with a box

Here’s a box. We can see what it is, but what could it be?
Let’s play by taking turns around the circle and using our artists imaginations to transform this box.
What is it for?
What does it do?
Should we change the way the box sits- change it’s orientation?
We want to see how many ideas we can generate.
Working together to launch the magic boat Image Copyright Heather Marsh, 2013
I am definitely doing this activity again with kids. It is so much fun. They turned the box into a couch, swimming pool, running track, rocket, upside down sailing ship, lost dogs home, babies' playground... 
Afterwards we recorded our ideas in visual diaries so that we can build on them when we start making our large fridge box constructions. 
An observer for one of the kids with additional needs was in the class and thanked me afterwards saying it was one of the best classroom experiences she had ever witnessed. 


New Vocabulary Assemblage, orientation, relationships

Wednesday, November 6, 2013

#8 Blotches, Splotches and A Treasure Map of Your Mind

Learning Areas: The Arts- creating and making, exploring and responding, Thinking- inquiry, creativity, Science- patterns, order and organisation, Communication- listening, viewing and responding
Materials: acrylic paint, paint pots, small plastic spoons, paint brushes, A4 paper, visual diaries, felt-tipped pens, coloured pencils and crayons


We are going to start a project together that I am very excited about: So far it is called Because of me  (the name might change as we go along)
The project is going to be about you: who you are, the things you like and do and the ways in which you influence the world around you.
We will be working towards using all of the ideas and things you create to design big box constructions to play and perform in. First though, we need to gather ideas... 

The place everything gets connected
We are going to go on a fascinating journey today: exploring the most important tool an artist has: our brain!
Artist’s notice things, gather things, imagine and think. When the thoughts and gathered things and ideas are very strong, an artist may choose to bring them together to create some art. When you bring everything together in art and are ready to begin making we call it a concept.
Let me show you a piece of art I finished recently. I made this after we made our colour targets (#3 Blending Colour: Transforming Spaces) You can see I chose to add more elements to my colour blend. 
The (next) Big Thing, Copyright Heather Marsh, 2013

We have a conversation about what they notice.They talk about the warm and cool colours - how they notice sea creatures and airplanes on the cool side and a heart and "seed" on the warm side. 

Before we get further into our artistic concept for the box project, lets put another element of art into our artists toolbox: shape.
Now, I know you all know what a shape is – how many shapes can you describe for me? What about shapes that aren’t regular – as in, shapes that can’t easily be measured?

Investigating: Rorschach Blots
Here is a type of shape I find very interesting. It is called a Rorschach blot. Do you think that would be tricky to say? Let's have a go..

How do you think this shape was made? Do you think the blot makes a picture of something you can recognise? 
What about this one – what can you see?

The children start to name the things they see, at first slowly and then once they get going they suddenly see many many objects, animals and people in the blots. 

Notice that because each of you is unique you see different things. Part of the specialness of being you is that you offer us a unique perspective.

Making: Colourful Rorschach Blots 

Lets make some Rorschach blots. We are going to use A4 paper and paint. Instead of using a paintbrush, though, we are going to use teaspoons to put very small blobs of paint onto the page.
There are some instructions for making this work:
Fold your page in half. Put a few small blobs of paint only on one side, close to the middle or in the middle.
Fold your paper and squish the paint around.
Unfold it to see your blot! What does it look like? Can you see a picture in your blot? 


*The challenge for some children is following all the instructions. This is a great opportunity for learning and without shaming children who did things differently, we usually discuss what we have produced in terms of personal satisfaction, what worked and didn't work and what we would do differently next time. 

Exploring: Mind Maps 

While our Rorschach blots are drying, lets explore artistic concepts again. I find when I am thinking about making some art, it helps to gather my ideas all in the one place. Recently I started doing mind-maps – it is like a treasure map to your brain and your ideas and thoughts are the treasure. 
Here are some mind maps I found: 
By Kira, Grade 6, Ararat Primary School 

Acknowledgment: Coach Shev Gul  www.swimmtech.com

Making... Again! 
In your visual diary you are going to begin a mind map. We don’t have to finish it today – it might be something that you return to and add to over time.
I would like you to begin by putting a shape or a small picture in the middle of the page, which we will call your centre – the thinking, connecting, joining stuff up bit of you. It could be a drawing of your brain, or your heart – or a sparkly gemstone – whatever you like that represents you.
Coming out from the centre we are going to draw paths. Each path can be different – wriggly or straight, thick or thin, dotted, textures – however you like. At the end of each path is something about you- a special thing you like, something you do well, your family or favourite pet, something you are really interested in.

New Vocabulary artistic concept, Rorschach blots, mind map, unique, perspective 

Tuesday, November 5, 2013

#7 An Expedition to Find Texture

Learning Areas: The Arts- creating and making, exploring and responding, Science- patterns, order and organisation, Communication- listening, viewing and responding, Interpersonal Development- working in teams
Materials: crayons, A3 cartridge paper, scissors, glue, paper scroll or very large scale paper (A0) for final collaborative work

As artists, you all know how to manipulate two elements of art to create different artistic compositions: colour and line
You also understand some of the ways you can present your work: installation, collage, drawing, painting, out-door ephemeral art.
Today we are all going to explore a new element to add to your artist’s toolbox - texture

Artist Feature: Del Kathryn Barton
I’d like to share with you some art by a very interesting contemporary Australian artist called Del Kathryn Barton.
She has won a big art prize (twice!) called the Archibald Prize, which is a portrait prize. Do you remember what a portrait is? 
She likes to use a lot of texture in her work. 
This is one of her portraits. …. What can you see?
The Daughter, Del Kathryn Barton 2011-12 Acrylic, gouache, watercolour, ink
Detail from The Daughter ( not original orientation)

Let’s read Move! By Steven Jenkins and Robin Page
As well as noticing texture throughout this book, we can also notice lots of ‘doing words’ which are called verbs.
You are going to get to practice your describing words from last lesson – your adjectives to talk about the textures you see.
Published by Houghton Mifflin Harcourt, 2011


Investigation: An expedition to find texture
Let's head outdoors on an expedition to find different textures using a technique called ‘crayon rubbing’
You may have done this experiment with coins.


Try to highlight each rubbing with a different colour. 
Choose three different coloured crayons to take with you on your expedition.
We are going to be using the rubbings to create a composition when we get back.

There is a lot of fun and excitement as the children find surfaces that make interesting rubbings. 


Making: Collage Texture Creatures
Lets have another look at the book ‘Move!’ we read earlier.
Can you see how the artist has created the animals?

We are going to draw some body outlines with a dark crayon over our texture rubbings. Then we will cut out the body parts and stick them onto a scroll to make an animal frieze.
Lets look at your rubbings to see what sort of animal they would best suit? I’d like us to get as many different animals as possible, so try to think of unique animals for your work.  

New Vocabulary rubbings, verb, texture

Monday, November 4, 2013

#6 Ultimate Pet: Imagining and Inventing

Learning Areas: The Arts- creating and making, exploring and responding, History- historical knowledge, Design - investigating and designing,  Communication- listening, viewing and responding, English -language and literature
Materials:  visual diaries, felt-tipped pens, crayons, coloured pencils


We have talked and experimented with two of the elements of art: colour and lineToday I want to get back to the heart of what art is.
Can you think of some of the reasons why we make art?
* children's responses are in inverted commas

"To find colours?"  

That's right. Art can be a way to explore and find out. 
"Making it about..things you are interested in" 
Yes! Artists often use their art to communicate or make a statement about something important to them. 

Art can also be about: 
- Transforming a space and changing the ways we see things - like Yayoi Kusama (#3 Blending Colour, Transforming Spaces)
- Telling a story like Ronnie Tjanpitjimpa (#4 Big Lines, No End in Sight) 
 -Imagining how the world could be different or inventing things, like an artist we are going to learn about today. 

Artists can be innovators who change the world. 

Tuning in : The Lost Thing by Shaun Tan
Let's read a book by one of my favourite author/illustrators - Shaun Tan. Shaun uses a variety of media to make his pictures and often adds tiny details that each add meaning to the work. 

The Lost Thing by Shaun Tan, Lothian Books, 2000 

The children are now used to 'turning on their artist eyes' to notice details and creative choices the artist has made. They point out the warm colours Shaun has used, express surprise at how much detail there is and wonder at how Shaun has created the many layers in the work. 


Artist Profile: Leonardo Da Vinci 
Leonardo Da Vinci was an artist who lived over 500 years ago. He was a polymath – which meant he was interested in and very good at many things. He was a painter, sculptor, architect, musician, mathematician, engineer, inventer, botanist, anatomist and writer. 
Leonardo was curious about everything. He used his artist eyes all the time to observe the world. 
He lived during a time called The Renaissance.


Leonardo imagined many things which didn’t exist yet during his time. 

We take some time to look at images of Leonardo and his inventions. The children are fascinated by his detailed drawings. 


Making
We are going to do some imagining and inventing today just like Shaun Tan and Leonardo Da Vinci. 
In your scrap books you are going to create the ultimate ‘lost thing’ pet:

I’d like you to do lots of imagining. How did you find your pet? Where does it live, what does it eat? Your pet can be funny, useful, scary, silly, beautiful or cuddly.
How many legs does your pet have? Does is even have legs?- maybe it has wheels or wings… Is your pet hairy or scaly or smooth? How does it see or sense the world? Why do you love your pet – what qualities does it have?

The children have been working in regular class on using adjectives and this is an opportunity to link with that learning to boost their confidence in using descriptive words. 

You can use any medium from your pencil case to create your pet -  crayon, coloured pencil or felt-tipped pen.

The children spend about half an hour working on their pets, which requires some effort to maintain attention and keep adding detail.   
Reflection
Lets talk about our pets. Can you think of three adjectives to describe your pet?

New Vocabulary  adjective, Renaissance, Leonardo Da Vinci, innovation  

Thursday, October 17, 2013

#5 Pictures Of You

Learning Areas: The Arts- creating and making, exploring and responding, Interpersonal development- working in teams, Communication- listening, viewing and responding, English -language and literature
Materials:  as many white wax crayons as children, heavy A3 paper, paint trays, watercolour paints, brushes, buckets of water, smocks

Tuning In - Let's Read a Book!
Are any of you familiar with this author? 
(holds up book I Want A Pet by Lauren Child) 
I Want A Pet Frances Lincoln Children's Books, 2013

Lauren Child writes and illustrates her own books. She isn’t too worried about being really neat with her lines – in fact she is quite messy, but I think they give a great feeling for what is happening in the story and how all the different characters are feeling.

Exploring: What is a portrait?

Who knows what a portrait is? 
"A picture of something?"
"Is it a pet?"
"Like a picture of somebody?"

That's right. It is usually a picture of a person, although it is also possible to make portraits of animals. Portraits usually show mainly the face of the person or animal, but might include the shoulders, the torso or the whole body. 
Portraits usually try to give you a sense of the character of the person and perhaps something about the way they are feeling. 
There are lots of ways to make a portrait. We are going to use a combination of techniques today.
The first technique is called continuous line
Continuous line is a game that artists like to play. The rules of the game are that once you put your pencil or in our case, crayon onto the paper, you don’t take it off until the drawing is finished. We had a play with continuous line when we drew with chalk out on the basketball court (#4 Big Lines, No End In Sight)
The second rule is that you try to look only at the person you are drawing – not at the paper.

Artists who make portraits

Self Portrait, Tracey Manuel, Date?
Look at this self-portrait (above). A self-portrait is when the artist has made a picture of themselves. This picture has been made by placing a black crayon (charcoal, chalk pastel or oil pastel) on the page and not taking if off until the picture is finished. 
Look at this second portrait of a woman (below).We don't need to feel limited by the colours that we see. An artist can paint, draw, paste or sculpt in the colours that convey what they want to say about what they see. 
Portrait of Lydia , Henri Matisse,  1947

Making - Part A 

We will use a crayon to draw portraits of one another. Here’s the tricky part – we are going to use white crayons. So even if you do look at your paper you won’t see much. There is a magic trick we’re going to do with our continuous line portraits but I’m going to keep that as a surprise.
The important things to remember are : 
1) Keep your crayon on the page. 
2) Look at the person you are drawing and 
3) to make our magic work you need to press quite hard with your crayon.

Drawing me drawing you drawing me... Image Copyright H.Marsh, 2013
*please do not repost images of children. This is against Australia law unless you have parental permission
The children set to work. They are seated in pairs across from one another: each drawing the other drawing. 
Preps and ones find it almost impossible to look at their subject and not at the page. I'm not sure that they even have any choice in this - it is as though when their hand is moving they must watch their hand. I find it so interesting to learn about the developmental stages and how they apply to art. Still, they are trying to represent the person in front of them and the style of each child is unique. 


Making - Part B

Now it’s time to make our magic.
I would like you to lay out your line portraits face down on the table. Your teacher and I are going to come around and write your name as artist and the name of the person you drew.
Great. Let me show you a line drawing I made earlier today.
Portrait of Juno , Image Copyright Heather Marsh, 2013

This portrait was made using a technique called wax resist. 
The waxy crayon acts just like an umbrella for the paper - letting the watery paint bead off - it won't stick to the page- leaving it white where you have drawn. 

We are going to re-use some techniques you guys are already familiar with. Do you remember when we make our colour targets with water colour? (#3 Blending colour, transforming spaces)
Can anyone tell me the techniques that helped us when we were working with that medium?
"Wash your brush?"  - yes, wash your brush between colours. 
"Don't drip water" - yes, wipe a little water off your brush, but remember we need the paint to be wet for this to work
"Be..don't bump or walk on other stuff" - yes, be respectful of each other as we share the paint trays. Don't walk on other people's art. Be aware of how you are moving in the space. 

It looks like chaos but it works! Image Copyright Heather Marsh, 2013
The results... 


Reflection

Lets talk about our work:
What did you notice about making your portraits. What was hard? What was easy? What worked? What didn’t work?
"I wanted to look" 
" I had to cheat and look"
" I didn't like that I couldn't see my drawing but I liked doing the magic later with the paint" 

New vocabulary portrait, self-portrait, continuous line, wax resist

Wednesday, October 16, 2013

#4 Big Lines, No End In Sight

Learning Areas: The Arts- creating and making, exploring and responding, Health and Physical Education- gross motor skills, Geography - spatial awareness, Communication- listening, viewing and responding, English -language and literature, Aboriginal and Torres Strait Islander histories and cultures
Materials: pavement chalk 

Tuning In: Remembering the element of colour

Lets take a moment to remember all the work we did with the element of colour. What can you remember?
"Finding the rainbows"
"When we stuck our colour targets to the walls"
"Making new colours with paint"
That's great - can any of you remember some of the new words we learned? What was the word for the rainbow colours - it was the visible...
With a bit of prompting they remember visible spectrum, primary and secondary colours and installation

Exploring: The element of line

Colour is just one of the elements an artist can use to express their ideas. Over the next few weeks we are going to collect more elements which you can combine to bring your ideas to life. 

I showed the class a quick line drawing I have made for them using different weight markers. (I frequently make new work inspired by class- it's a great motivator!) and we spend a little time noticing thick lines and thin lines, wavy, jagged, vertical, horizontal,concentric, zig-zag and scribbly lines. We also noticed how lines were used for representational drawing and the areas where the lines were abstract.
Quick Line Drawing - Image Copyright Heather Marsh, 2013

Exploring some more: Let's read a book!

I read the class the story Say Hello by Jack and Michael Foreman. It uses a single continuous line throughout the illustrations, which, in turn becomes the horizon and various scenes on the pages. As usual we used our 'artist eyes' to notice things on the page. 
Say Hello Published Candlewick Press, 2012
Still Exploring..Artist Feature - Aboriginal artists

We looked at three important Indigenous (Australian) artists and how they have each used line differently - to map the contours of the land, to depict cracked claypans and to mimic and mock modern art.
Drawing the land- Kaliangku the claypans painting of Jackie Kurltjunqinja Gile (Mr. Giles)
Critiquing the politics of art - Scientia e metaphysica, 2002  by Richard Bell
Mapping - the contour line paintings of Doreen Reid Nakamarra and Ronnie Tjampitjinpa  
Untitled Ronnie Tjampitjinpa 2001 (Art Gallery of NSW)

Making - Worlds biggest continuous line work?
When we got onto making the real fun began. I explained to them the concept of continuous line - that as an exercise, sometimes artists will experiment with not taking their pencil off the page until the work is complete. 

We are going to use chalk now to draw onto a very large surface – the basketball court. It is going to be a very big artwork.  I would like you to each take a piece of chalk – it will stay your piece for the whole time we work. 


Massive continuous line work *please note it is illegal to repost images of children without parent permission
I would like you to try to draw patterns with your chalk using an unbroken line. (draw example on the whiteboard) so that if I found the very beginning of your line I could follow it all the way to the end where you finished. 
After we finish the art will get worn away by people walking on it and washed by the rain. This type of art-making is called ephemeral, which means it isn't meant to last.

Remember, the only rule in this art game is: do not take your chalk off the ground until it is completely used up. 

Some of the children worked in small groups *please do not repost images of children 
Some children went on long solo journeys with their chalk 
*please do not repost images of children 

Reflection 
Instead of discussing our work as a group, I asked the children to stand up on the seats by the side of the court and walked up to each in turn asking "Tell me about your line." The children each described a completely unique individual process. 
"I, like went as fast as I could from one end to the other to see how quick I could use up my chalk"
"I sort of drew around the other guys" (at which I commented that he had essentially mapped the movement of the other artists for us) 
"I wanted to draw things- it was hard not taking the chalk off"

New Vocabulary vertical, horizontal, concentric, contour,  ephemeral 
Further Explorations contour lines and mapping, aboriginal desert communities, being inclusive (Say Hello)