Thursday, October 17, 2013

#5 Pictures Of You

Learning Areas: The Arts- creating and making, exploring and responding, Interpersonal development- working in teams, Communication- listening, viewing and responding, English -language and literature
Materials:  as many white wax crayons as children, heavy A3 paper, paint trays, watercolour paints, brushes, buckets of water, smocks

Tuning In - Let's Read a Book!
Are any of you familiar with this author? 
(holds up book I Want A Pet by Lauren Child) 
I Want A Pet Frances Lincoln Children's Books, 2013

Lauren Child writes and illustrates her own books. She isn’t too worried about being really neat with her lines – in fact she is quite messy, but I think they give a great feeling for what is happening in the story and how all the different characters are feeling.

Exploring: What is a portrait?

Who knows what a portrait is? 
"A picture of something?"
"Is it a pet?"
"Like a picture of somebody?"

That's right. It is usually a picture of a person, although it is also possible to make portraits of animals. Portraits usually show mainly the face of the person or animal, but might include the shoulders, the torso or the whole body. 
Portraits usually try to give you a sense of the character of the person and perhaps something about the way they are feeling. 
There are lots of ways to make a portrait. We are going to use a combination of techniques today.
The first technique is called continuous line
Continuous line is a game that artists like to play. The rules of the game are that once you put your pencil or in our case, crayon onto the paper, you don’t take it off until the drawing is finished. We had a play with continuous line when we drew with chalk out on the basketball court (#4 Big Lines, No End In Sight)
The second rule is that you try to look only at the person you are drawing – not at the paper.

Artists who make portraits

Self Portrait, Tracey Manuel, Date?
Look at this self-portrait (above). A self-portrait is when the artist has made a picture of themselves. This picture has been made by placing a black crayon (charcoal, chalk pastel or oil pastel) on the page and not taking if off until the picture is finished. 
Look at this second portrait of a woman (below).We don't need to feel limited by the colours that we see. An artist can paint, draw, paste or sculpt in the colours that convey what they want to say about what they see. 
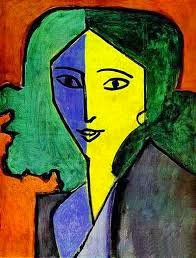
Portrait of Lydia , Henri Matisse,  1947

Making - Part A 

We will use a crayon to draw portraits of one another. Here’s the tricky part – we are going to use white crayons. So even if you do look at your paper you won’t see much. There is a magic trick we’re going to do with our continuous line portraits but I’m going to keep that as a surprise.
The important things to remember are : 
1) Keep your crayon on the page. 
2) Look at the person you are drawing and 
3) to make our magic work you need to press quite hard with your crayon.

Drawing me drawing you drawing me... Image Copyright H.Marsh, 2013
*please do not repost images of children. This is against Australia law unless you have parental permission
The children set to work. They are seated in pairs across from one another: each drawing the other drawing. 
Preps and ones find it almost impossible to look at their subject and not at the page. I'm not sure that they even have any choice in this - it is as though when their hand is moving they must watch their hand. I find it so interesting to learn about the developmental stages and how they apply to art. Still, they are trying to represent the person in front of them and the style of each child is unique. 


Making - Part B

Now it’s time to make our magic.
I would like you to lay out your line portraits face down on the table. Your teacher and I are going to come around and write your name as artist and the name of the person you drew.
Great. Let me show you a line drawing I made earlier today.
Portrait of Juno , Image Copyright Heather Marsh, 2013

This portrait was made using a technique called wax resist. 
The waxy crayon acts just like an umbrella for the paper - letting the watery paint bead off - it won't stick to the page- leaving it white where you have drawn. 

We are going to re-use some techniques you guys are already familiar with. Do you remember when we make our colour targets with water colour? (#3 Blending colour, transforming spaces)
Can anyone tell me the techniques that helped us when we were working with that medium?
"Wash your brush?"  - yes, wash your brush between colours. 
"Don't drip water" - yes, wipe a little water off your brush, but remember we need the paint to be wet for this to work
"Be..don't bump or walk on other stuff" - yes, be respectful of each other as we share the paint trays. Don't walk on other people's art. Be aware of how you are moving in the space. 

It looks like chaos but it works! Image Copyright Heather Marsh, 2013
The results... 


Reflection

Lets talk about our work:
What did you notice about making your portraits. What was hard? What was easy? What worked? What didn’t work?
"I wanted to look" 
" I had to cheat and look"
" I didn't like that I couldn't see my drawing but I liked doing the magic later with the paint" 

New vocabulary portrait, self-portrait, continuous line, wax resist

Wednesday, October 16, 2013

#4 Big Lines, No End In Sight

Learning Areas: The Arts- creating and making, exploring and responding, Health and Physical Education- gross motor skills, Geography - spatial awareness, Communication- listening, viewing and responding, English -language and literature, Aboriginal and Torres Strait Islander histories and cultures
Materials: pavement chalk 

Tuning In: Remembering the element of colour

Lets take a moment to remember all the work we did with the element of colour. What can you remember?
"Finding the rainbows"
"When we stuck our colour targets to the walls"
"Making new colours with paint"
That's great - can any of you remember some of the new words we learned? What was the word for the rainbow colours - it was the visible...
With a bit of prompting they remember visible spectrum, primary and secondary colours and installation

Exploring: The element of line

Colour is just one of the elements an artist can use to express their ideas. Over the next few weeks we are going to collect more elements which you can combine to bring your ideas to life. 

I showed the class a quick line drawing I have made for them using different weight markers. (I frequently make new work inspired by class- it's a great motivator!) and we spend a little time noticing thick lines and thin lines, wavy, jagged, vertical, horizontal,concentric, zig-zag and scribbly lines. We also noticed how lines were used for representational drawing and the areas where the lines were abstract.
Quick Line Drawing - Image Copyright Heather Marsh, 2013

Exploring some more: Let's read a book!

I read the class the story Say Hello by Jack and Michael Foreman. It uses a single continuous line throughout the illustrations, which, in turn becomes the horizon and various scenes on the pages. As usual we used our 'artist eyes' to notice things on the page. 
Say Hello Published Candlewick Press, 2012
Still Exploring..Artist Feature - Aboriginal artists

We looked at three important Indigenous (Australian) artists and how they have each used line differently - to map the contours of the land, to depict cracked claypans and to mimic and mock modern art.
Drawing the land- Kaliangku the claypans painting of Jackie Kurltjunqinja Gile (Mr. Giles)
Critiquing the politics of art - Scientia e metaphysica, 2002  by Richard Bell
Mapping - the contour line paintings of Doreen Reid Nakamarra and Ronnie Tjampitjinpa  
Untitled Ronnie Tjampitjinpa 2001 (Art Gallery of NSW)

Making - Worlds biggest continuous line work?
When we got onto making the real fun began. I explained to them the concept of continuous line - that as an exercise, sometimes artists will experiment with not taking their pencil off the page until the work is complete. 

We are going to use chalk now to draw onto a very large surface – the basketball court. It is going to be a very big artwork.  I would like you to each take a piece of chalk – it will stay your piece for the whole time we work. 


Massive continuous line work *please note it is illegal to repost images of children without parent permission
I would like you to try to draw patterns with your chalk using an unbroken line. (draw example on the whiteboard) so that if I found the very beginning of your line I could follow it all the way to the end where you finished. 
After we finish the art will get worn away by people walking on it and washed by the rain. This type of art-making is called ephemeral, which means it isn't meant to last.

Remember, the only rule in this art game is: do not take your chalk off the ground until it is completely used up. 

Some of the children worked in small groups *please do not repost images of children 
Some children went on long solo journeys with their chalk 
*please do not repost images of children 

Reflection 
Instead of discussing our work as a group, I asked the children to stand up on the seats by the side of the court and walked up to each in turn asking "Tell me about your line." The children each described a completely unique individual process. 
"I, like went as fast as I could from one end to the other to see how quick I could use up my chalk"
"I sort of drew around the other guys" (at which I commented that he had essentially mapped the movement of the other artists for us) 
"I wanted to draw things- it was hard not taking the chalk off"

New Vocabulary vertical, horizontal, concentric, contour,  ephemeral 
Further Explorations contour lines and mapping, aboriginal desert communities, being inclusive (Say Hello)

#3 Blending Colour, Transforming Spaces

Learning Areas: The Arts- creating and making, exploring and responding, Thinking Processes - creativity, inquiry, reflection,  Inter-personal Learning, Science, Health and Physical Education- gross motor skills,manipulative skills, English -speaking and listening, vocabulary extension
Materials: water colour paints (high pigment), thick and medium brushes, large paint trays, at least two buckets of water, A3 sheets of paper of 130gsm or higher (otherwise they get really soggy!), scissors, bluetack, smocks 

Tuning in: Lets read!

You all know how much I love to begin with a good illustrated story book or two. 
We've been exploring colour - where it comes from, the moods and feelings it can evoke. Today we are going to play with blending and separating colours. 
I have a great book here which really illustrates separated colours: Mozzie and Midgie by Doug Macleod and illustrated by Sandy Okalyi 
We take our time to look at each page and the children share what they notice - the book has some very funny parts and a great message about being unique. 

Then we read a book that shows blending colour: Flood by Jackie French and Bruce Whatley. 
Flood was written to remember the devastating 2010-2011 Queensland floods (Australia). It has themes about loss, bravery, volunteering and community spirit. We notice how the watery, dripping use of water-colour is sympathetic with the book's themes and how the cool colours and earth tones give the book a sad, moody feeling. 
  
Creating and Making: Colour Targets

We are going to use water-colour paint and heavy paper to blend and separate colour.
Lets all turn out artist ears on to listen to the instructions.
On the floor in trays are water-colour paints in different colours. In the buckets are water to dip or wash your brush. The paint has a lot of pigment in it so you only need to use a little to get a good effect. 
We are going to start by choosing one colour of paint to make a circle on the paper. Then while that paint is still wet, we are going to paint another circle either just inside the first circle or just outside it – just like a target.  Use your artist eyes to discover new colours which are made when the colours blend.
Each page can fit about three or four targets. When you have filled a page, we are going to put them in the sun to dry.
Watercolour Targets Image Copyright Heather Marsh 2013

Primary colours: red, blue, yellow 
Secondary colours: orange, purple, green


I would like to acknowledge Heather Smith Jones' wonderful resource Water, Paper, Paint for the colour targets idea. I really recommend this book! http://heathersmithjones.com/water-paper-paint/

Technique: Working with water colour 

We are going to use some paint techniques today:
-Dipping your brush in water and wiping off
- Picking up the right amount of paint
- Washing between colours - not letting the colours mix on the brush and turn to brown


*I won't bore you with the details but basically I spend a good two minutes here talking the children through very explicit instructions: wetting their brush, wiping off just enough water so that the brush doesn't drip, picking up some pigment, washing the brush and wiping off in-between colours. I consider this important as listening to and being able to follow instructions is something preps and ones are really working on. 

Controlled Chaos...  *please note it's illegal to re-post images of children without parental permission


Exploring – Artist Feature: Yayoi Kusama 
I would like to introduce you to a special artist today. I find this artist very inspiring. Her name is Yayoi Kusama.
From a young age Yayoi saw the world in a different way – she could see dots everywhere. She uses a lot of colourful polka-dots in her work.
Yayoi mainly does paintings, sculptures and installation. Does anyone know what an installation is?
It is placing the artwork so that it takes up a space – not just on a wall. The idea is for the art to transform that space.  Installation art is 3 dimensional and can often include the audience (in that the audience can sometimes be inside the artwork if the art takes up a whole room). 

I show them images of some of Yayoi's artworks. They are very large and colourful. The children are fascinated by the 'Infinity Rooms' which use mirrors and illuminated colourful spheres to make it look as though  you are in an endless space filled with floating orbs. 

Image via ABC Radio National page - awaiting photo credit 


More Making: Our own installation 

Lets get our colour targets now and cut them out.
We are going to use them to transform a space – just like Yayoi Kusama.
Cut out the dots and put a dob of blue tack on the back of each one.
We are going to transform the alcove in the senior building. You can stick your dots anywhere you like - on the walls, the furniture, even the ceiling!

The teachers have a ladder and the children instruct us where to stick their colour targets (if they are too high for the children to reach themselves). 

Reflection
Lets talk about our work:
What did you notice about blending and separating colour?
What did you like about making an installation? How does it transform the space?

New Vocabulary Blend & Separate, pigment, installation, primary & secondary colours

Further Resources
Book: 21st century art for kids, Queensland Art Gallery 

Wednesday, October 9, 2013

#2 A Colour Poem for You

Learning Areas: the arts - creating and making, exploring and responding, interpersonal learning, English- speaking and listening, vocabulary extension, observation, visual communication
Materials: acrylic paint (suitable for 5 year olds), brushes, paint pots, newspaper (for protecting surfaces), old magazines with diverse high quality content (old national geographics, special interest hobby magazines), scissors suitable for 5 year olds, glue sticks
Healing the Heart, Albert - grade prep, Image Copyright 2013


This is my second session with preps and year ones. 
I ask the children to "turn on your artist eyes" - which means to become super observant of the kinds of details many people overlook. We begin by sitting in a circle. My current practice is to avoid using raised hands when asking the children to respond. We are all practicing the kind of co-operative, intuitive turn-taking that is expected out in the world. 

Tuning in: Our colour spectrum scroll 

I would love to see the collaborative work you made last week and see how it has changed since you worked on it between classes. 

We get out the mixed media colour spectrum scroll (from session#1 Art- What's that about?) and roll it out. 

Lets use our artist eyes and notice some things about this art-work.You might notice some things about lines, shapes, the shades of colour, the depth of colour, patterns, representational images (pictures of things you can recognise), what has happened to the paper, spaces that haven’t been filled...

The children do pretty well at not talking over one another. They share what they observe:

"I can see lots of scribbly lines" 
" I can see lots of red over there" 
" I did that bit - that's indigo and violet" 

Exploring: artists who use colour in their work

Today I’m going to share some artists with you who have made illustrations for books.  Sometimes artists use colours to convey an emotion - to make you feel a certain way or to let you know how the characters are feeling.  The colours can be grouped into two 'feeling groups' : cool colours and warm colour.
This book is called  Oh, No! George. I like it because it's funny. Lets see what you think. With your artist eyes turned on, tell me as we read, what you notice about how the artist has used colour. 

Copyright Walker Books, 2012. 
I read Oh, No! George and the children tell me what they see. They notice that the pages with George doing naughty things is warm or hot colours and the pages with Harris are cool. They also notice that on some pages the colour goes all the way to the edge of the page but on other pages it has a border.

We call this full bleed when the illustrator has decided to make the colour go all the way to the edge of the page. 

Shall we read another book? This one is called Where Does Thursday Go?

The children start to show that they are picking up new vocabularly quickly- telling me which pages are full bleed and telling me that the illustrator has mainly used cool colours. We talk a little about the feelings the colours create. 
Copyright Scholastic Books, 2002

"I think cool colours are a bit sad"
" I think Harris has cool colours because he is, like, a bit more sensible than George"
" George has lots of orange and purple" 

Exploring and Responding: A Colour Poem for You

In the week between lessons I have written a poem for the children about colours and the feelings they evoke and made an art-work to show them: a visual 'colour poem'. 

I am RED
Copyright Heather Marsh, 2013
I crackle and burn
I burst like fireworks
Sometimes I am sweet like strawberrys 
Or spicy like chillies
I wake you up with sirens
I am RED

I am ORANGE
I am the dusty soil of the desert
Or a citrus grin at the footy
I glow on birthday candles
& slow you down at traffic lights
I am ORANGE

I am YELLOW
I shake my shaggy lions mane
And lift my sunflower head to follow the light
I can make you screw your face up with lemoniness
Or melt on your tongue like button on toast
I am YELLOW

Copyright Heather Marsh, 2013
I am GREEN
I shoot,curl, sprout and grow
In leaves, buds and blades of grass
I’m a python wound around a tree
Sometimes I’m disgusting like snot
But also cool like dappled shade
I am GREEN

I am BLUE
I wash the sea and sky clean
And dress you every day for school
I’m a1st prize ribbon on sports day
And icy cold toes in winter
I am BLUE

I am INDIGO and VIOLET
The colours of royal robes and
Cadburys chocolate wrappers
I make purple irises sway like flags
I am the ink to use for a love poem
I am INDIGO AND VIOLET

Making: A paint and collage colour poem 

We are each going to make an artwork today that tells the viewer a story about colour.

I show my artwork (pictured above at beginning of poem)

The type of work we are going to make is a monochrome work. That means that I have used only one colour in my composition
We are going to begin by applying paint to part of the page, then we are going to layer drawings and cut out collage images to the work to produce a picture that evokes a mood and tells a story.

I ask the children to listen to all the instructions before choosing a place to work at one of the tables. There are sheets of mid weight white A3 paper laid out and the rest of the materials: paint, scissors, magazines, paper. 
I tell the children where each colour is located and that they will need to choose just one colour for this composition. 
I ask them to lay down their paint first and then layer their colour poem with images using collage or crayons. 

Take some time to look at the page and think about your composition.
Be aware of how much paint you apply to your surface. The paper can only absorb so much paint before it begins to warp or break down.
If you work across your paint your work will smudge. If you want to smudge that is ok – we can incorporate it into the artwork. If you don’t like smudges you will need work differently to not drag your arm across the page as you apply other media

Some of the students' colour poems are shown throughout this blog entry. I really noticed how individual each child's approach was. 

Image Copyright Heather Marsh, 2013


Reflection 

Lets talk about our work:
We are going to walk around the room and use our artist eyes to notice things about one another’s work. Remember to be respectful – at this point we are all experimenting so there is no need to criticise the work.

New Vocabulary monochrome, composition, collage, warm colours, cool colours, media, warp, full bleed

#1 Art: what's that about?

Learning Areas: science, interpersonal learning, fine motor skills, English (speaking and listening, extending vocabulary) 

Materials: glass prisms suspended by framing wire, bubble blowers and (good quality) bubble mix, long paper scrolls, drawing mixed media (wax and oil pastel crayons, coloured pencils, coloured felt-tip pens), some examples of my work 

Prehistory(panel1 of 4) Copyright Rufus and Heather Marsh, 2011


March, 2013
This is the first lesson I did with two mixed classes of preps and year ones. I have an hour with each group. There are about 17 children in each class. The classroom teacher is present and participates (which is great!) 


I wanted to know what the children knew.  

I asked them if they would be comfortable trying to take turns talking the way adults do - by waiting for an opportunity to speak, by being attentive and non-verbally negotiating - rather than raising hands and being called on.
explained that adults actually find this tricky too. 
We began with a short conversation about the nature of art. The children's responses are in quotation marks.  

Tuning In: What is art and why do we make it?  

Who am I? My name is Heather. I am an artist. 
What is art? Can you tell me anything you know or think about art? 
The Gift Of Hindsight  Heather Marsh, 2008

"Art is painting" 
"It can be drawing" 
"I think it's pictures"
"Paintings.."
"I like drawing things..." 

You already have some ideas about what art could be. 
I make art to communicate ideas in a way that is different to just talking or writing about it. 
I like that my artwork allows people to find their own meaning about what I have made.

At the moment I am interested in making art about a few different things:
-  thoughts and memories or stories from my past
-  funny conversations
-  the relationship people have to nature. 


I don’t like to stick to just one way of working. Sometimes I use collage, sometimes I paint or do sculpture but a lot of the time I draw with pen and ink.

I show them The Gift of Hindsight (pictured, above) and pass around inked eggs. I show my drawing book and a collage from a children's illustration (Eupholus Bloom pictured below) 


I'm excited to explore with you the things you are interested in and how you might like to share those ideas through art.   
Eupholus Bloom Copyright Heather Marsh, 2009


Exploring:The Elements of Art

How do we make art?  

"We use paint" 
" We can draw on paper with crayons 
or pencils" 
"I like drawing dogs"
"I want to draw my horse"

There aren’t any strict rules for how to make art. In fact there are limitless ways to make art. You can learn about the different elements of art though, to help to shape your visual idea or message the way you want to. 
The first element we are going go explore today is colour.

The big question we are going to try to answer today is “Where does colour come from?”

Investigation: Let's Find Colour

I take the children outside. It is a sunny day. I have prisms on twisted framing wire that hang from sturdy plastic handles. I also have bubble blowers. 
We go to a big open area and the children begin a mission: to find rainbows. They are very excited and cluster in groups around the rainbows they are making on the ground with the prisms. I ask them to notice how many colours they can see and ask them to name them. 
Playing with prisms, Copyright 2013

We come inside and talk very briefly about the colours that we found – how white light is broken into the visible spectrum. We talk about the other things we need to make colour – our eyes. 

Other animals see colour differently to us because of the structure of their eyes. Bees can see ultra violet light. Cats and dogs mainly see in black and white and grey, but they can see some blue and yellow. 

Cows cannot see colour at all – their world is in what we call grey-scale. 
Colours in the visible spectrum arered, orange yellow, green, blue, indigo and violet


Making: A colour spectrum scroll 


We are going to collaborate on a large-scale piece of art. 

I have a long scroll of paper. I divide the class into seven groups. Each group is assigned a colour in the visible spectrum and begin free drawing to fill their area. 
Some of the children draw recognisable things, others enjoy making scribbles, shapes and textures. The result is very effective (and I apologise- I didn't take a photo!) 
The final work is a frieze of colours blending gradually into one another from red through to violet, composed of swatches of texture, patterns, scribbles, pictures of dogs, horses, trees, flowers, cars, faces and monsters.. 

Reflection


We gather around the scroll on the floor and talk about the things we notice. 


"I tried to fill up the whole page"" Can you see there? That's my horse"" It looks good the way everybody has drawn together" 


I can see that some of you have made representational drawings - pictures of things we can recognise. Some of you made abstract drawings - shapes and textures. 

We sit back in our circle and close our eyes. 

In your mind I'd like you to travel back in time to when we were outside looking for colour.  Think of the things you saw  and did and what you learned about where colour comes from.

"I could see the rainbow straight away""When I spinned the prism around it made sparkles" " I couldn't see all the colours."" I want to know how all the colours come out of sun"   


I thank them all for such an inspiring first session. 

Following this class, Sam, one of the prep teachers leads an investigation in science to find out more about the spectrum, how we see colour and how other animals see colour. 

My Learning: Prep's and Year 1's are fun and exhausting 


I have loved my first class with preps and ones. I'm excited about discovering and creating with them. I also feel like I have run a marathon. The prep teachers assure me this will pass. When I get home I have a Nana nap. I realise that I need to make time to document their work - even if I feel too tired after the pack-up! I really wish I had taken photographs of the spectrum scroll. 


New Vocabulary  spectrum, elements of art, prism, collaborate, collage, grey-scale, representational, abstract 


Further Resources

http://www.colormatters.com/color-matters-for-kids/how-animals-see-color